场景
平常业务开发中, 对于网络请求,我们一般会封装成一个模块,并且暴露 get、post 方法供大家使用。
1// src/util/request.js
2import Http from '../http'
3
4export function get(options) {
5  return Http.get(options)
6}
7
8export function post(obj) {
9  return Http.post(options)
10}
Http 模块主要是将 ajax 请求封装,填充一些 headers 等等,然后业务方使用的时候只需要引入上边的 get、post 即可。
1import { post, get } from 'src/util/request';
2
3async generateShareImage() {
4  const body = this.generateConfig();
5  try {
6    const res = await post({
7      url: '/getData',
8      body,
9      setting: {
10        domain: config.getExhibitionDomain(),
11      },
12    });
13    if (res?.picUrl) {
14      return res;
15    }
16    return null;
17  } catch (error) {
18    log.error(`失败`, JSON.stringify(error));
19  }
20  return null;
21}
现在有了一个新需求,我们需要将第一次请求中,后端返回请求中的 graytype 字段塞到后续请求中的 headers ,也就是下边这样。
1import { post, get } from 'src/util/request';
2let graytype = -1;
3async generateShareImage() {
4  const body = this.generateConfig();
5  try {
6    const options = {
7      url: '/getData',
8      body,
9      setting: {
10        domain: config.getExhibitionDomain(),
11      },
12      headers: {
13
14      }
15    }
16    // 之前拿到了 graytype 就塞入
17    if (graytype !== -1) {
18       options.headers.graytype = graytype;
19    }
20    const res = await post(options);
21    // 新增逻辑
22    if (res.graytype !== undefined && res.graytype !== null) {
23        graytype = res.graytype;
24    }
25    if (res?.picUrl) {
26      return res;
27    }
28    return null;
29  } catch (error) {
30    log.error(`失败`, JSON.stringify(error));
31  }
32  return null;
33}
如果只是一个请求的话就按上边这样改就可以了,但如果是多个请求一个一个这样去改就有些傻了。
那直接去改 Http 模块?也是不行的,增加 graytype 字段只是我们负责业务的改变,而 Http 模块是所有业务线所共用的,我们并不能直接去改变它。
此时就需要代理模式了。
代理模式
贴一下 维基百科的一些解释:
What problems can the Proxy design pattern solve?
- The access to an object should be controlled.
- Additional functionality should be provided when accessing an object.
What solution does the Proxy design pattern describe?
Define a separate Proxy object that
- can be used as substitute for another object (
Subject) and
- implements additional functionality to control the access to this subject.
代理模式就是对原有对象进行扩展,从而实现对原对象的控制或者进行额外的操作,不同场景下代理模式又可以细分出很多类别:
-
远程代理:通过代理模式,实现像操作本地对象一样的操作远程对象。
-
虚拟代理:In place of a complex or heavy object, a skeleton representation may be advantageous in some cases. 常见的比如大图的加载,我们可以通过引入代理对象,先加载一张小图,大图加载完毕后再显示大图。
-
保护代理:将原有对象的属性访问进行权限控制。
-
缓存代理:引入缓存,将之前的结果进行缓存,常见的比如斐波那契数列。
...
不管起了什么新名字,它们的本质都是一样的,如果用类图表示就是下边的样子:
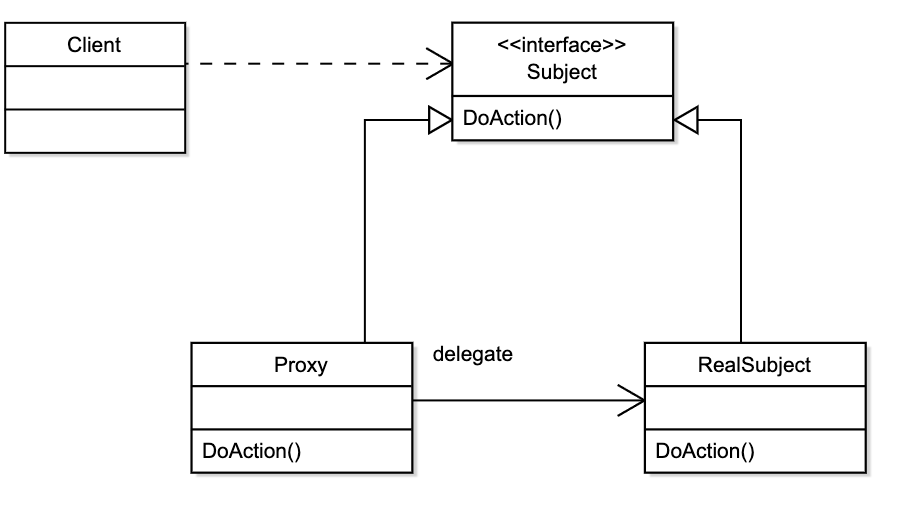
原对象 RealSubject 和 Proxy 对象都继承了 Subject 这个接口,客户端 Client 调用 DoAction() 方法,先经过代理对象 Proxy ,然后由 Proxy 做一些额外的操作,最终再委托给 RealSubject 进行执行。
看一个 Java 的示例:
1interface Image {
2    public void displayImage();
3}
4
5// On System A
6class RealImage implements Image {
7    private final String filename;
8
9    /**
10     * Constructor
11     * @param filename
12     */
13    public RealImage(String filename) {
14        this.filename = filename;
15        loadImageFromDisk();
16    }
17
18    /**
19     * Loads the image from the disk
20     */
21    private void loadImageFromDisk() {
22        System.out.println("Loading   " + filename);
23    }
24
25    /**
26     * Displays the image
27     */
28    public void displayImage() {
29        System.out.println("Displaying " + filename);
30    }
31}
32
33// On System B
34class ProxyImage implements Image {
35    private final String filename;
36    private RealImage image;
37
38    /**
39     * Constructor
40     * @param filename
41     */
42    public ProxyImage(String filename) {
43        this.filename = filename;
44    }
45
46    /**
47     * Displays the image
48     */
49    public void displayImage() {
50        if (image == null) {
51           image = new RealImage(filename);
52        }
53        image.displayImage();
54    }
55}
56
57class ProxyExample {
58   /**
59    * Test method
60    */
61   public static void main(final String[] arguments) {
62        Image image = new ProxyImage("HiRes_10MB_Photo1");
63        image.displayImage();
64    }
65}
原有的 RealImage 类在 new 对象的时候就会调用 loadImageFromDisk,如果之后没有调用 displayImage 并且 loadImageFromDisk 比较占资源,那就会是一种浪费。
通过 ProxyImage ,其内部持有 RealImage 的对象,当调用 displayImage 再去实例化对象,实现了对象的延迟加载。
当然也带来了坏处,可能会导致第一次调用 displayImage 的时候比较耗时。因此,在这个示例下是否引入代理模式,就看实际场景下的取舍了。
我们再用 js 来改写一下:
1function RealImage(filename) {
2  this.filename = filename
3  const loadImageFromDisk = () => {
4    console.log(`Loading   ${filename}`)
5  }
6  loadImageFromDisk()
7  return {
8    displayImage: () => {
9      console.log(`Displaying ${filename}`)
10    },
11  }
12}
13
14function ProxyImage(filename) {
15  this.filename = filename
16  let image = null
17  return {
18    displayImage: () => {
19      if (image === null)
20        image = RealImage(filename)
21
22      image.displayImage()
23    },
24  }
25}
26
27// Test
28const image = ProxyImage('HiRes_10MB_Photo1')
29image.displayImage()
整体思想是一样的,但 js 不用定义接口,也不用定义类,看起来精简了不少。只需要实现和原对象一样的返回即可。
代码实现
回到最开始的场景:现在有了一个新需求,我们需要将第一次请求中,后端返回请求中的 graytype 字段塞到后续请求中的 headers 。
我们可以通过代理模式将 request.js 中的 get 和 post 进行封装,然后同样暴露出 get 和post 即可。
1// src/util/requestNew.js
2
3import { get as Get, post as Post } from './request.js'
4
5let graytype = -1
6
7function getNewParams(params) {
8  // 将 graytype 加入
9  if (graytype !== -1) {
10    newParams = {
11      ...params,
12      headers: {
13        ...params.headers,
14        graytype,
15      },
16    }
17  }
18  return newParams
19}
20export async function get(params) {
21  const response = await Get(getNewParams(params))
22  const res = response.data
23  if (res.graytype !== undefined && res.graytype !== null)
24    graytype = res.graytype
25
26  return response
27}
28export async function post(params) {
29  const response = await Post(getNewParams(params))
30  const res = response.data
31  if (res.graytype !== undefined && res.graytype !== null)
32    graytype = res.graytype
33
34  return response
35}
我们将原有的 get 和 post 导入,因为还需要导出 get 和 post ,所以将导入的重命名为 Get 和 Post 。
然后在请求前将 grayType 塞入到 headers ,并且 get 和 post 的时候给 grayType 进行赋值。
这样在实际业务中,如果需要 grayType ,我们只需要从新写的 src/util/requestNew.js 引入 get 和 post 即可,其他什么都不需要改动。
总
代理模式其实说简单了就是对原有对象/函数再包装一层,并且保持和原对象一致的行为。那么为什么不直接改原对象呢?
第一,可能不方便直接改原对象,所以只能采取代理模式包一层了。
第二,「单一职责原则」,如果直接修改原对象,会增加原有对象的复杂度,原对象如果负责的职责过多,引起对象改动的原因就会增多。
第三,未来如果新功能要去掉,修改起来也不方便。如果使用了代理模式,只需要把原来引用的地方还原即可。